
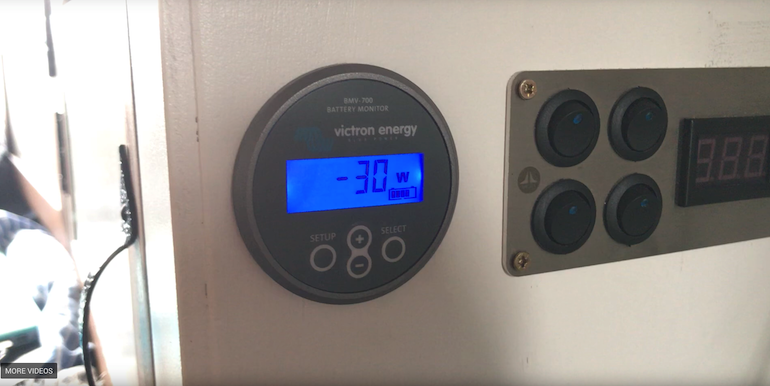
If you’re anything like me you’ll love staring at this piece of equipment. So apologies in advance for any obsessing over the power your solar panels are generating or how much power 30 seconds of hair-drying actually uses!
What is a battery monitor
A battery monitor is a device which is able to tell you detailed information on load and charge of a battery. It also monitors battery history and the number of cycles a battery goes through. Battery monitoring in a van conversion is really important as discharging your batteries too much can lead to damage.
This applies to both AGM & Lithium ion batteries the core difference being the maximum level of discharge you can go to, 50% for AGM and 80% for lithium ion.
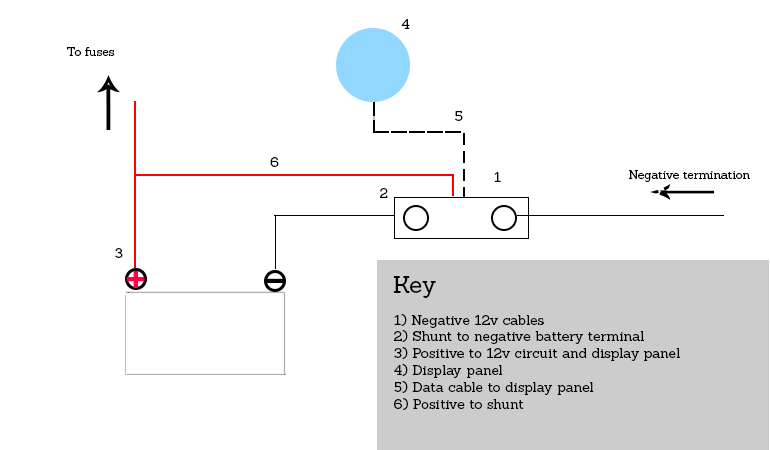
A battery monitor with ammeter functionality measures the input and output of a battery by analysing the current flowing in/out of the positive and negative terminals. It requires all grounded wires to ground on a shunt which is then connected to the negative terminal, while no positive interception is needed and a connection is made directly to the battery.
This shunt is the core brains of the battery monitor and is what the user interface panel is plugged into.
A voltmeter can be referred to as a battery monitor however it lacks some important functionality, so this post generally doesn’t refer to voltmeters as a battery monitor.
Do I need a battery monitor
 Battery monitors for rv’s and van conversions come in two forms. A battery monitor which measures voltage also known as a voltmeter, and a battery monitor which measures volts and amps more commonly known as a battery monitor.
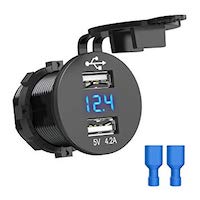
A voltmeter can be a very simple solution which can measure the current voltage of your battery. These are simple and cheap like the one in the picture. All they require is for you to know the ranges of the state of charge of your battery type. Like this chart for AGM batteries
The issue is that this reading has no context of the current draw on the system or whether the system is actually being charged, either by your alternator or solar panels. This could mean that you miss a fault and you run out of power far faster than you expect.
In our opinion this will also leave you prone to causing some damage to your batteries. Batteries are not cheap, you could be costing yourself hundreds if not thousands if you’re not careful.
Our recommendation is always to install a battery monitor with an ammeter reading functionality.
Here are some of our recommendations if you’d like a simple voltage reading.
Can you install a battery monitor in an existing electrical system?
Yes you can install a battery monitor in a van conversion, rv or motorhome which already has an electrical system. Its simplicity will vary depending on how easy all of your grounding points are and the type of monitor you install.
If using a shunt you will need to route all negative connections through the shunt. Skip to our install step to check out how we installed ours. Or read our review of the BMV-700 battery monitor.
What units does a battery monitor measure?
A battery monitor measures at minimum measures in volts, the better kinds also measure amps and amp hours.
Volts measure the current voltage of the battery. Amps measure the current flowing in and out of the battery. When your alternator or solar panels are charging the battery this will be a positive reading. Inversely when the fridge is running this will be negative.
Finally amp hours measure the time of the amps flowing in/out of the battery. This is a very useful datapoint when checking the amount of power you’ve got left in your battery to run your computer, cooker etc.
1 amp hour is when 1 amp is discharged continuously for 1 hour. A typically led light in a campervan will use 2W. Using the formula P = V * A we can rearrange to calculate how many amps this will use. 2 / 12 = 0.16A. This means a 100ah agm battery which can be discharged to 50% can run these led lights for 300 hours, thats almost 2 weeks!
How many cycles will my battery last?
This is majorly influenced by the type of battery that you have. A full cycle is classified as the battery being discharged fully (50% for AGM, 80% for Lithium) and then charged back up again.
AGM on average can be discharged between 200-500 times depending on your manufacturer. While lithium ion batteries can be discharged 2000-5000 times.
Does a battery monitor work on different volt batteries?
Depending on the type of battery monitor you’ve chosen it’ll be able to measure batteries of varying voltage. Most common battery voltages, 12,24 and 48V can be measured by Victron systems.
Best Battery Monitors
| Name | Brand | Price | Max Battery Size / AH | Find more details |
|---|---|---|---|---|
| Victron Battery Monitor BMV-700 | Victron | $$$ | 10,000 |  |
| Victron BMV-712 Battery Monitor | Victron | $$$ | 10,000 | |
| AiLi Battery Monitor Voltmeter Ammeter | AiLI | $ | 100 | |
| Xantrex Technology Inc, 1445DP3CHR 84-2031-00 | Xantrex | $$ | 10,000 | |
| bayite DC 6.5-100V 0-100A LCD | Bayite | $ | 100 | |
There are not a huge number of battery monitors on the market. Victron energy produce some of the best. We have been using the Victon BMV-700 in our van conversion and it’s processed over 220 KWH of energy usage, this is over 10,000 cups of coffee!
RV battery monitor wiring guide
 Word of warning this is a general setup guidance and the setup of individual battery monitors may vary.
Step 1) Planning your layout
As with many stages of converting a van into a tiny home the planning stage is really important. You need to plan to be able to run a cable from the battery monitor to a display panel which should be easy to get to from the living space of your van. This is the stage which is hardest to accommodate if you’re installing into an existing system.
Step 2) Terminating your negatives
All terminations must flow into the shunt. If you terminate a circuit straight onto the battery or grounding point then you will not be able to measure the current that has been used and your readings will be inaccurate.
You therefore must ensure you have a good grasp of where your circuits are terminating. If they do ground elsewhere in the van you’ll need to get a buss bar like this which you can connect the existing terminations into and then run one grounding wire to the shunt.
It’s common that connecting to the negative terminal on the battery is the last stage of the installation procedure so do this final step once you’ve connected your negatives to the shunt.
Step 3) Connecting the positive
The shunt also needs to be connected to the positive terminal, a thin low amperage wire is needed to do this.
Step 4) Setting up your monitor
Before you can get accurate readings you’ll need to tell your monitor what type of batteries you’re using and how big they are. Once you’ve setup this information and you’re batteries are fully charged the battery monitor will be able to accurate measure the load on your system
Battery monitor in action
A short video which shows our battery monitor in action on a overcast day in Norway!