
Why is van insulation important?
Campervan insulation is really important in order to moderate the temperature within your van. Typical campervan conversions will use a panel van as a base vehicle, but the thin metal walls will very easily transfer heat and equalise to external temperatures. If you’re in extremely hot or cold climates this could mean a lot of discomfort. Van insulation will ensure that the temperature equalisation process is slowed way down and you stay comfortable in your tiny home!
This epic insulation guide includes all the research we did when converting Maeve into our all-year-round adventure vehicle.
Firstly a quick trip back to school on how heat transfer works
Heat transfer can occur in three ways, radiation, conduction and convection.
Heat radiation
Energy is transferred through electromagnetic radiation and is absorbed by a material and this energy is transferred and the result is the object getting warmer. Think of our skin warming up on a hot day from the suns rays.
In a van heat radiation is an issue at the windows as the glass allows this energy to pass through and warm up the inside.
Heat radiation can be reflected and this is why you should have reflective materials in your windows as a radiant barrier.
Heat conduction
Conduction is when energy is transferred within a material between molecules. If you put a metal pole in a fire, the metal in contact with the fire would heat up and because it’s a solid object transfer this energy to where you’re holding it. In vans this is exactly the same where the outside of the van conducts heat through to the inside, this can be through the 5mm van wall or through the ribs of the van. Insulation is key at being a thermal break to stop this happening.
Heat convection
This is the process of heat movements in liquids and gases. Hot air rises and cold air falls. Within a van it will be warmer at the van ceiling and cooler by the floor because of heat convection and this is why having a roof ran to extract air from the ceiling is effective at cooling a van and reducing the impact of convection.
With this all being said insulation materials can stop these heat transfer methods from happening.
What types of insulation can you use in a campervan?
You’ll come across quite a few options in choosing the best van insulation material for you. Some of these are the same as you’ll find in many standard homes. Others, however, are more bespoke and harder to come by, and therefore far costlier to your wallet but potentially a much better insulation investment.
We recommend considering the following when choosing your van insulation material:
Toxicity
This was a big deal for us, as we didn’t want any particulates or gases contaminating our small living space. We were running away from the city because of air pollution so didn’t want any respiratory aggravators or health risks.
R-value
As you’ll need to maximise the space in your van, it’s important to use a material which has a high insulating value per inch. R value is the industry standard at measuring how well a material resists heat transfer. A high r value will be a more effective insulator.
Moisture resistance
In a small space you’ll generate moisture from cooking, showers, breathing etc. Each human on average will exhale around 500ml of moisture during a nights sleep. In a small van this results in quite a moisture dense situation.
You’ll want to use insulation which is moisture resistant to stop any mould growth or take precautions to ensure no moisture can access your insulation using a vapour barrier. We discuss whether or not using a vapor barrier is a good idea later in the post.
Cost
If this is your first build then it might be hard to appreciate the value of van conversion insulation. If you have a large van it’s a significant part of your budget and tempting to neglect. Planning ahead and measuring and understanding the material you’ll need will mean you can source all at once and get a better rate.
Eco friendliness
Some insulation options are very eco friendly, as they are made from recycled plastics or old clothes. Others not so much. If you want to be more eco conscious this is something to consider, and there are a variety of options now available. More on this further on!
With these key points in mind, here are the options you have available:
| Type of insulation | R value | Price | Toxicity | Eco-Friendliness |
|---|---|---|---|---|
| Closed Cell Spray Foam | 7 | £££ | 2 | 2 |
| Polyisocyanurate (Polyiso/PIR/Celotex) | 6 | ££ | 3 | 2 |
| Extruded Polystyrene | 5 | ££ | 3 | 1 |
| Expanded Polystyrene | 3.9 | ££ | 3 | 2 |
| Fiberglass | 3.8 | £ | 5 | 2 |
| Rock wool | 4.3 | £ | 4 | 2 |
| Denim | 3.7 | ££ | 2 | 4 |
| Sheep wool | 3.7 | ££ | 1 | 5 |
| Thinsulate/Polyester | 3.7 | ££££ | 1 | 4 |
Polyisocyanurate (PIR) van insulation
In the UK this is commonly known by the primary manufacturer of the product, Celotex. Within the US, it’s most frequently called foam board insulation.
PIR insulation is an excellent choice because it is lightweight, moisture resistant, affordable, non-toxic and fire resistant.
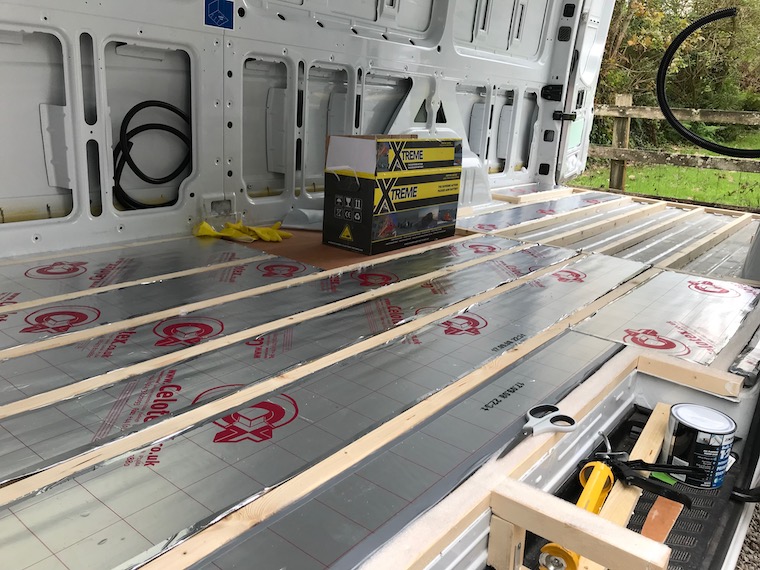
Foam boards come in a range of thicknesses and are excellent choices for insulating the ceiling and floor of a van conversion. The only danger is from inhaling the dust created when cutting the boards. We found using a sharp knife created a very clean cut with minimal dust, but we were also careful to use masks when cutting. Either side of PIR insulation is usually a reflective barrier which helps keep radiant heat within your van.
Our PIR Verdict: Great for sub floor and ceiling
Reflectix – Campervan foil insulation
This material is very widely used in van conversions, but often incorrectly! It’s a thin bubble wrap with a reflective coating and holds a very low R value.
Reflectix is excellent at reflecting radiant heat but it is not efficient at stopping the transfer of heat.
The common mistake is adhering Reflectix straight onto the metal of a van and then adding another layer on top. Heat passes straight through the reflectix from contact with the metal through conduction and makes it totally ineffective. Reflectix really needs an air gap to be effective.
Reflectix is great when being used as a window blind as it reflects heat back. To make it more attractive, we covered it in thick cloth. It’s also moisture resistant and can be used as a vapour barrier which is how we used this material in our van build.
Our Reflectix Verdict: Great for vapour barrier & window covers
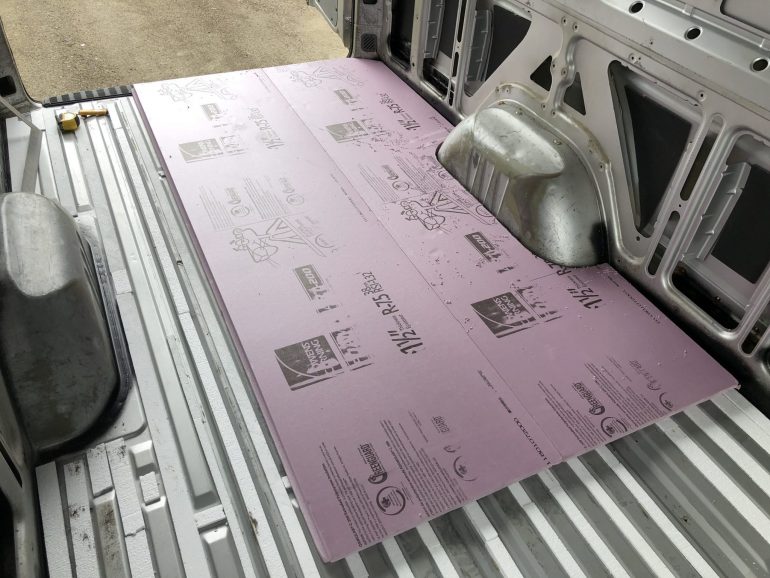
Polystyrene van insulation
What is the difference between extruded and expanded polystyrene?
Extruded polystyrene is arguably one of the most environmentally unfriendly products in this list. This is due to the manufacturing methods using hydrofluorocarbons via an extrusion process and polystyrene polymer.
Expanded polystyrene is manufactured without these gases as by-products and has a far more air gaps within its structure. The trade off is that this renders it slightly less moisture resistant.
Both types of polystyrene are similar in structure to PIR insulation which comes in a range of thicknesses. The major health consideration is the inhalation of particles from cutting or from abrasion within your van.
It has a good R value slightly less than that of PIR but both types are slightly cheaper. It’s far more resistant to compression than PIR which makes it a popular choice for use in flooring. It is however far less flame resistant and when it combusts gives off styrene gas which can causes CNS damage.
Our Polystyrene Verdict: Great for sub floor
Closed cell spray foam insulation
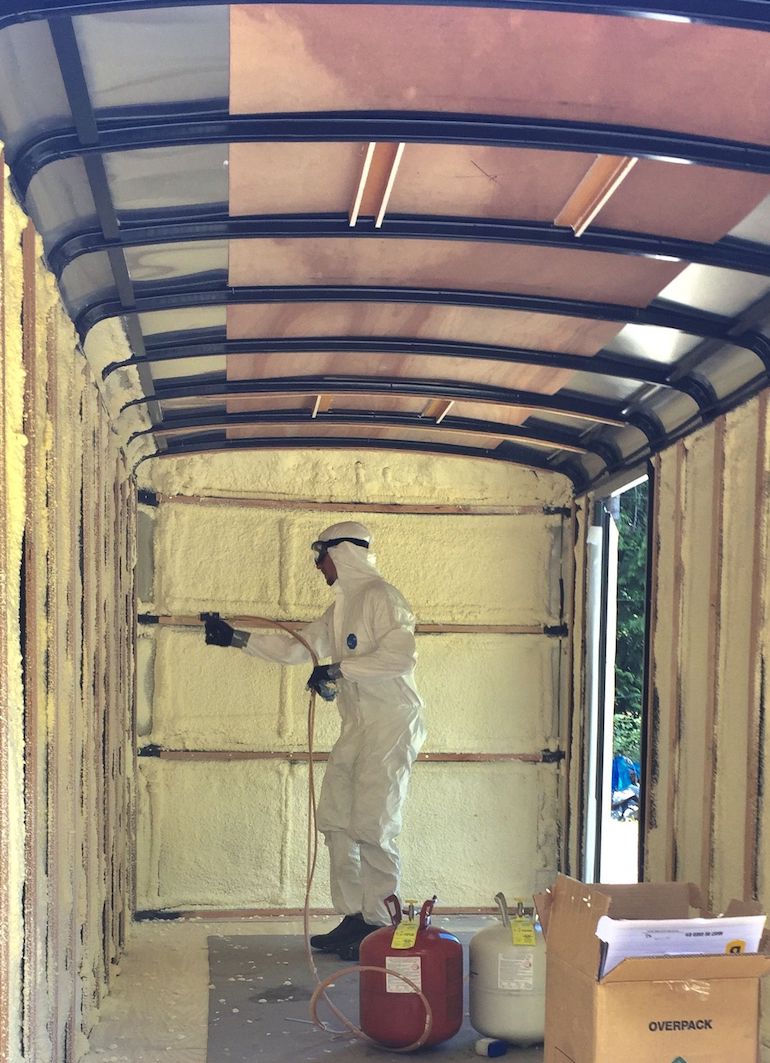
This is the most effective insulating material on the list and if installed correctly can completely shield the metal on your panel van from interior moisture as it is impermeable.
It’s often recommended to seek professional help when installing as the foam expands over time and over-spraying can damage your van through extrusion.
This is also one of the most permanent options. Removing this stuff is a nightmare so make sure you’ve planned out your entire setup well and have left conduit with enough room to thread any extra cables/pipes you require.
You can buy disposable spray foam cans from building suppliers which are great for filling gaps and ribs within the van walls or complete kits from online sellers.
Our Spray Foam Verdict: Great for extreme insulation & moisture protection
Fibreglass van insulation
Fibreglass is our least favourite insulation but also the cheapest.
Fibreglass has been used for many years, and although it is an effective insulator, our concerns come from its toxicity. Contact with skin will result in a rash and it naturally sheds very small fibres, which will be exaggerated through vibration in the van. If inhaled, these can cause respiratory damage.
Another downfall is that it is not moisture resistant and will mould if it gets wet.
If you use fibreglass, wear the necessary protection when installing it and make sure it’s completely sealed up with a vapour barrier after installation.
Our Fibreglass Advice: Use with extreme caution and ensure you seal it up
Rock wool/Mineral wool van insulation
Mineral wool is perhaps one of the most common household insulation materials within the UK.
It’s slightly more effective than fibreglass and slightly less toxic. It still has a tendency to shatter into shards which are an irritant so using the correct protection when installing is absolutely necessary.
Our Rock Wool Advice: Use with caution and ensure you seal it up
Denim van insulation
 This ticks all the boxes for the eco savvy van lifer, made from recycled denim clothes and with a reasonable R value this can be a great choice.
It’s major drawback is that it’s extremely moisture absorbent and will need to be very well protected from moisture sources. It’s sometimes known to be a bit of a breeding ground for mites if left exposed, so be sure to seal it up very well.
Our Denim Advice: Use with caution and make sure you have a vapour barrier
Sheep wool insulation
Another win for the renewable sector, sheep’s wool has a decent R value and is naturally moisture resistant and breathable.
You will need to use more of this than you will foam but if you want a naturally source product this is a good bet.
Our Sheep’s Wool Advice: Great eco all rounder
Thinsulate insulation & Polyester camper insulation
3M have created Thinsulate, which is a product used in a lot of outdoor clothing garments to keep you warm. You can also buy rolls of the stuff to have the same effect in your van.
It’s a good sound deadener and has good moisture and flame resistant properties.
By far the most expensive option on the list, but for valid reasons.
There are other products out there that use similar materials such as recycled polyester insulation. We used this on the walls of our van and it was really easy to work with. The result? Our cosy Maeve!
Our Polyester Advice: Great eco all rounder
How not to insulate your campervan
Having watched hours of YouTube videos on insulation, we want to highlight some common errors to avoid:
- Do not apply Reflectix directly on the van walls.
- If your insulation is moisture absorbent, ensure you use a vapour barrier.
- Do not crush wool/polyester based insulation. Doing this will reduce its R value, as it needs air within it to hold its insulating properties.
How much insulation do you need?
The more extreme of climates you intend on exploring in your home on wheels will increase the level of insulation you require. In our instance, we intended to be between -10 degrees celcius and +35. We wanted the ability to keep warmth in and keep warmth out at an equally balances level.
We opted for 1 inch PIR insulation on the floor and roof and 15cm polyester insulation on the walls and doors.
If you are insulating your van for cold climates, you will want to increase the R value by increasing the thickness of your insulation. In hot climates you will hit a diminishing return faster by add more and instead ventilation and reflecting radiant heat will have more of an impact on your overall comfort.
Insulation for the floors and ceiling
We recommend using PIR here as long as you have a solid floor. Laying the insulation between the batons of your floor is relatively simple and quick.
Likewise for the ceiling, as heat rises using a very high R rating is a must to stop the heat from escaping too quickly.
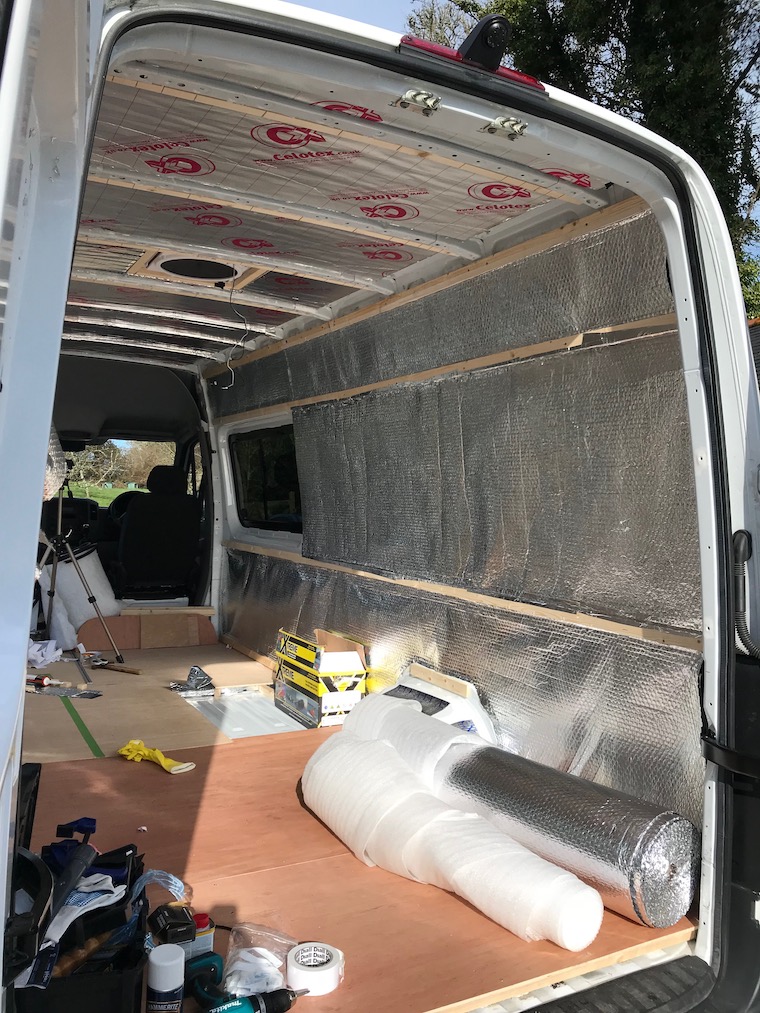
For the walls we recommend using polyester insulation because it is very eco-friendly and moisture resistant.
We opted to install a vapour barrier, using Reflectix as this final layer before installing the walls.
Do you need a vapor barrier in a van conversion?
Using a vapour barrier in theory will stop the generated moisture from living in a van from contact with the metal van walls which can lead to rust.
The argument against it is that getting moisture behind the walls is inevitable in a van, and once water gets behind the vapour barrier it will not be able to escape. Therefore the vapour barrier does potentially more harm than good.
It may make more sense not to use a vapour barrier if you won’t be in cold temperatures for a long period of time. However with the plan to live in the Alps for a couple months, we felt protecting the metal from cooking/breathing was a better option than risking that natural evaporation would solve the problem.
Step by step campervan insulation installation guide
Insulation is the next stage after you’ve stripped the van, dealt with any rust, installed your windows and fans and made sure you’ve run electrical cables.
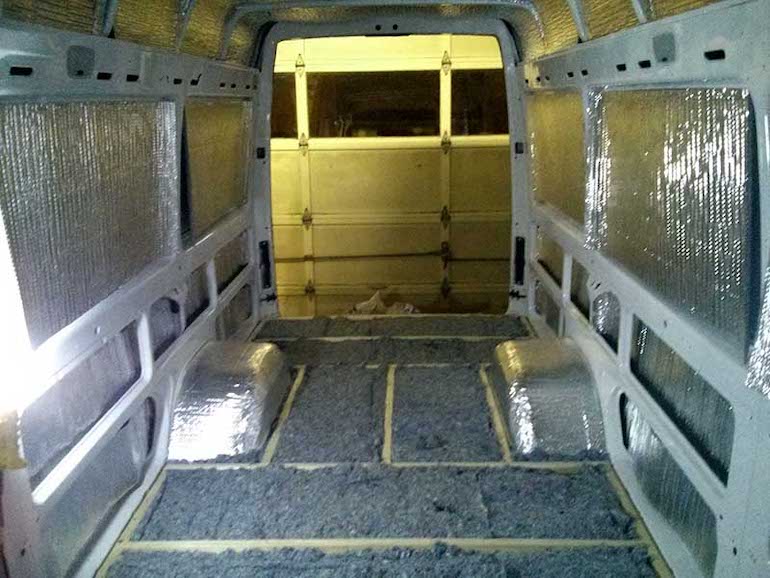
Step 1) Install your flooring
We wanted to maintain height in our van, so we installed batons in the ribs of our floor in order to be able to lay 1 inch PIR in between. On top of this, we installed 9mm birchwood ply. The batons were quite close together, which enabled us to get away with this slightly thinner ply as weight on the floor is more even distributed.
We glued our batons down with high strength glue rather than using screws, as this minimised the number of holes we’d otherwise need to make in the van. This means (you know the drill by now!) less opportunities for moisture to get in and therefore less rust.
Step 2) Cutting your insulation to fit the gaps
Using a sharp Stanley knife, we cut the insulation and sealed it with aluminium tape. We did this as an added precaution to ensure no exposed foam surfaces.
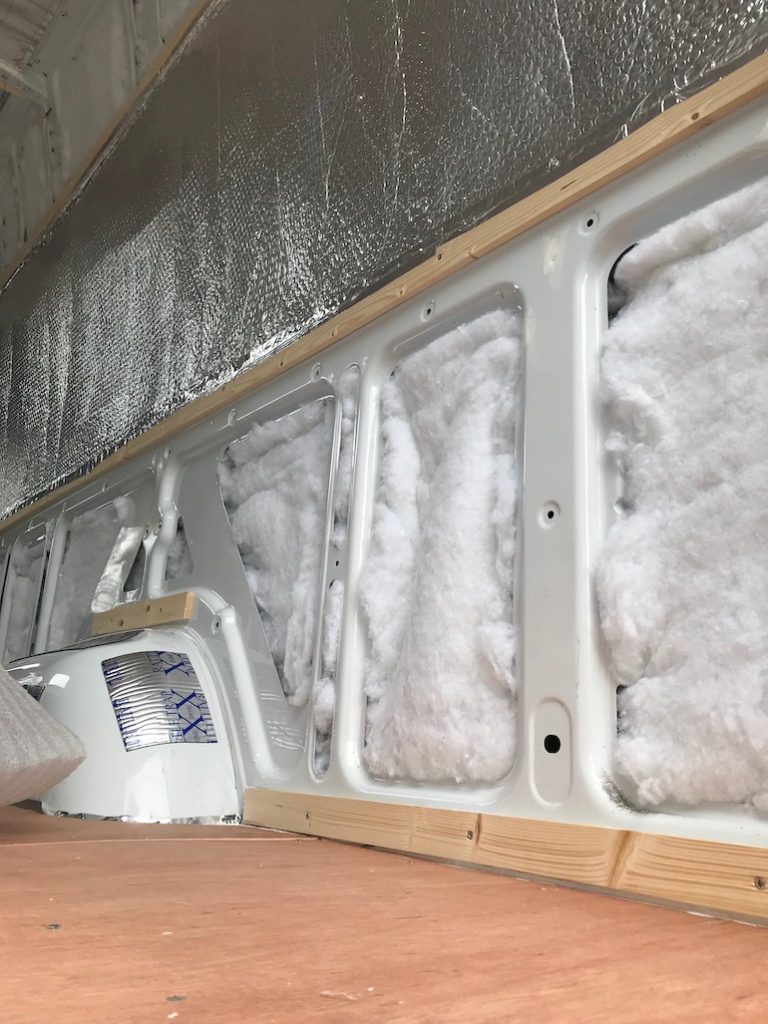
Step 3) Packing the walls with polyester eco wool insulation
Warning: Trying to cut eco wool is a nightmare as it’s really tough stuff and all the scissors we bought to do the job didn’t live up to the challenge. Our lives became a thousand times easier, however, once we realised that simple controlled ripping by hand was the best way to get the shape needed.
We used contact adhesive to fix the insulation to the walls, and we also stuffed it in all the ribs and cracks. The latter part was quite painful and time consuming, and could be avoided if you opt to use foam insulation in these tricky-to-reach parts of the van. We persevered, however, given our goal to minimise any potentially aggravating gases.
Step 4) Fitting batons to the roof ribs and gluing PIR to the roof
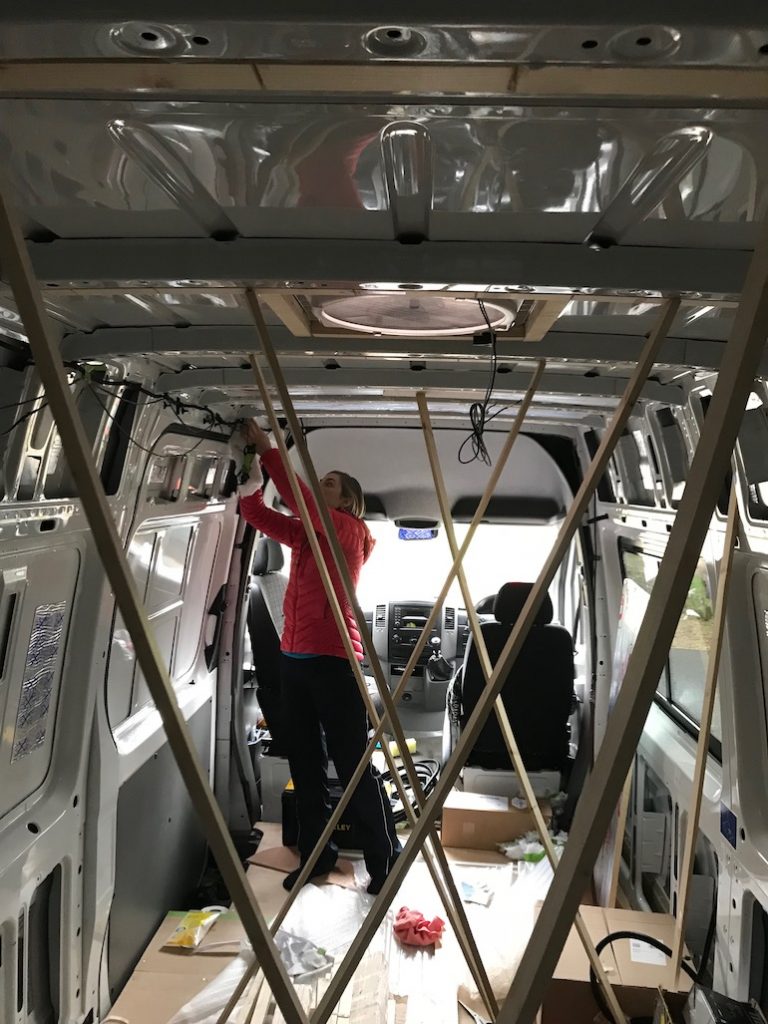
We glued and screwed in batons to the sides of the vans metal roof ribs. These were bent to the curvature of the van to maximise height.
Then it was a case of cutting and gluing the PIR to the ceiling using high strength and temperature resistant glue.
Step 5) Furring strips and vapour barrier
We then installed furring strips along the length of the van so that we could attach the walls. Once we’d done this we used aluminium tape and Reflectix to create a vapour barrier.
FAQs
What is R value?
R value is a measure of the thermal resistance of a material in how well it can stop heat transfer.
Pin this post on pinterest