

Trolltunga was great.
(I mean you can stop there if you really want to, we won’t judge.)
Will and I are not planners. We’re not very organised people. But by God we organised for Trolltunga, and thank sweet baby Jesus we did. The night before, we got all of our kit ready. We had a clothes, gear and bags put together, ready to go, and I made the best trail mix on the planet if I do say so myself. I put together some sandwiches (because I’m American and therefore good at sandwich-making, not because I’m female, let’s just get that straight), and we went to bed early.
Actually we didn’t, we went to bed at midnight, which is surprisingly late considering we were going to be getting up at 6am, but hey ho. No one is perfect.
So come 7am, when we actually did get up, we were ready to head off to the glorious hike to Trolltunga.
Parking and Costs
We didn’t quite expect how expensive Trolltunga would be, considering most hikes are, well, free. In our converted van, we couldn’t go to the parking lot right at the start of the hike (nor were we there in time anyway, as it was full by 7:45am), so we had to stay in the lower lot. The cost of parking was the equivalent of £30. Ouch, okay. But at least we would be allowed to stay overnight, as long as we left by 8am the next morning.
But then, we had to pay £10 each for the shuttle up to the upper parking lot/start of the hike. Knowing we would be absolutely bombed after the hike (which we were), we knew we’d have to take this shuttle back down to the van, as another 6km down a steep, narrow mountain road with shuttles driving on it probably wasn’t the best idea. So for just parking and shuttles, the hike cost us £70.
We probably could have paid only £50 by getting a shuttle from the town of Odda not too far away (£25 each from the Odda Camping site), so that’s a little tip from us to you. But the Odda shuttle doesn’t run quite as frequently, and we saw a lot of pretty sad looking hikers waiting for their shuttle after the hike.
We could also have paid £10 MORE apiece by getting another shuttle up to the ‘second’ start point of the hike, which avoids the first (and hardest) 4km stretch of the hike up some very steep switchbacks. We opted to go for the full 28km roundtrip hike, so we took the switchbacks and just avoided eye contact with the shuttle-goers on the way up.
Hike and Technical Details
Starting Point: Skjeggedal, Odda
Distance: 28km roundtrip
Duration: 6-8 hours for experienced hikers with breaks, or 10-12 hours for less experienced and/or families
Season: Without a guide, mid May to mid September. You can hike outside of the summer season with a guide.
What to bring: Water, food (snacks and meal), compass, map, headlamp/flashlight, camera
What to wear: Hiking boots and bring layers, as you always should in alpine mountains!
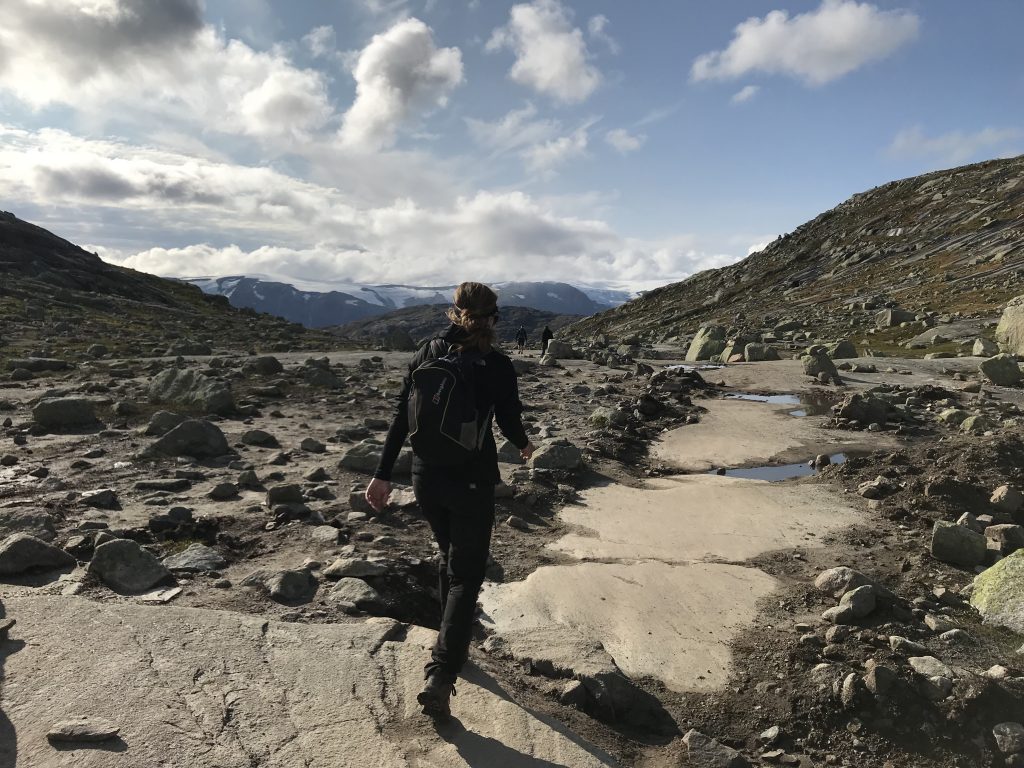
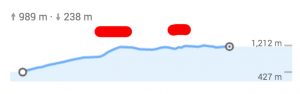
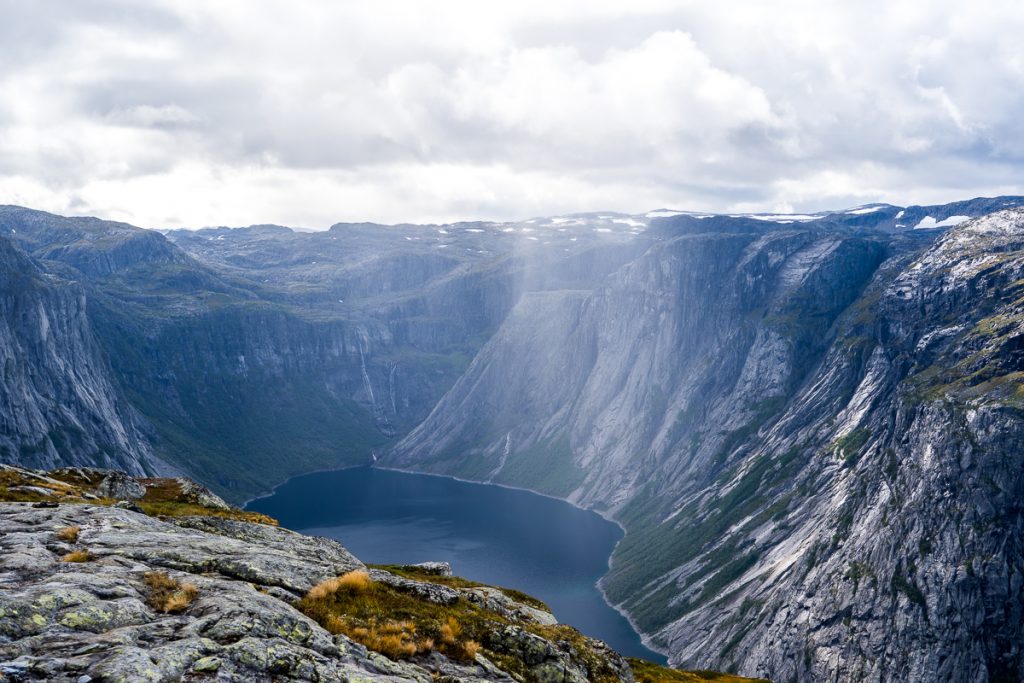
The Trolltunga hike is 14km each way from the bottom of the switchbacks, or 10km each way if you start from the top of those. The hike is rated ‘black’ or ‘hard’ by Norwegian standards, primarily because of how long it is but also because there are three difficult parts fairly evenly spread along the route (see map below), including the switchbacks at the start. The switchbacks are on asphalt, so physically demanding but not very technical, whereas the two difficult parts later on in the route are a bit more technical with steep climbs over rocky terrain, often wet with general Norwegian mountain wetness, so they can be a bit slippery and muddy as well.
Trolltunga Hiking Map
All in all, the hike is not that difficult if you are a seasoned hiker and/or physically fit, and even doable if you are less than tip top shape, though in that case we’d recommended skipping the first 4km of switchbacks because they aren’t particularly interesting and really just tire you out. Just be aware that the shuttles stop past a certain point in the afternoon, so you will have to hike that additional 4km down. The time they stop seems to change so look for notices – when we hiked it on the 26th of August, the shuttles to the upper-upper parking stopped at 5:30pm. If you really aren’t fit and don’t have proper shoes, you may be too exhausted to find it enjoyable, so better to start a bit less demanding and work your way up! No matter your experience though, do wear proper hiking shoes. Anyone on the trail who didn’t was clearly struggling.
 The elevation gain from the bottom is about 1,200m, or around 4,000ft.
As experienced hikers, it took us exactly 3.5 hours to hike the 14km to Trolltunga, including breaks, and about 2.5 hours to hike down, again including breaks. This does NOT include the 3 hours we waited for our photo op on Trolltunga itself. That’s right, you read correctly, THREE. HOURS. Do we regret that wait? Yes. More on that later.
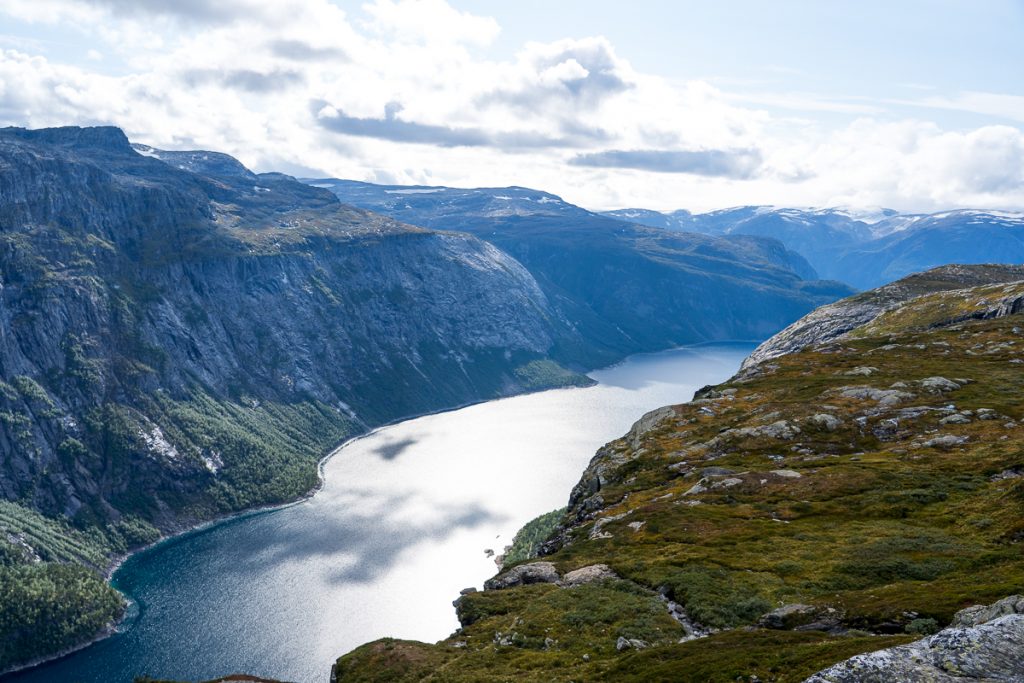
The hike itself is glorious. The landscape is varied and breathtaking, at times crossing boulder-strewn mountain slopes dotted with crystal lakes and criss-crossed with icy meltwater streams and others cresting the rugged mountain side looking down into the deep blue Ringedalsvtnet Lake (yes, it is a lake, not a fjord, though it is indeed fjord-like). You’ll often find yourself reaching for your neck to make sure an evil, semi-sentient gold ring isn’t hanging there on a chain, or perhaps resisting the urge to bash fish heads agains the lake rocks whilst howling bittersweet ballads to the moon. And your precious.
There are kilometre markers along the way which were sometimes welcome, sometimes a bit like the Norwegian trolls were laughing in my face, depending on how arduous the particular stretch we’d just completed was. Important to note is that the Norse gods decree that you should not begin the hike past 9am. That’s almost kind of true, depending on the time of year that you go. Obviously, during summer the day is very long, so you don’t have to worry quite as much about descending in the dark, but do note that certain points are marked along the route were you should not go beyond them past a certain hour of the day. If you do, without proper gear and the intention to camp, a mountain warden will stop you and tell you to go back. We saw it happen to a group of youths, and they were none too pleased as you can imagine. But that’s what you get for sleeping in until noon, you….YOUTHS! Jk, we have nothing against youths. We were youths once.
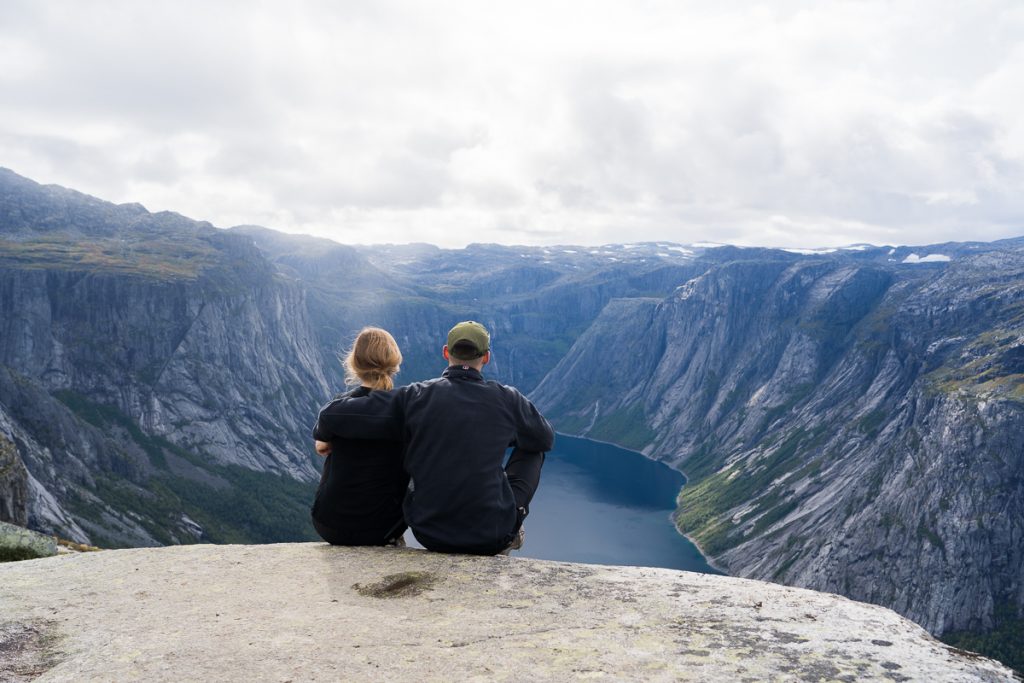
Trolltunga Photoshoot
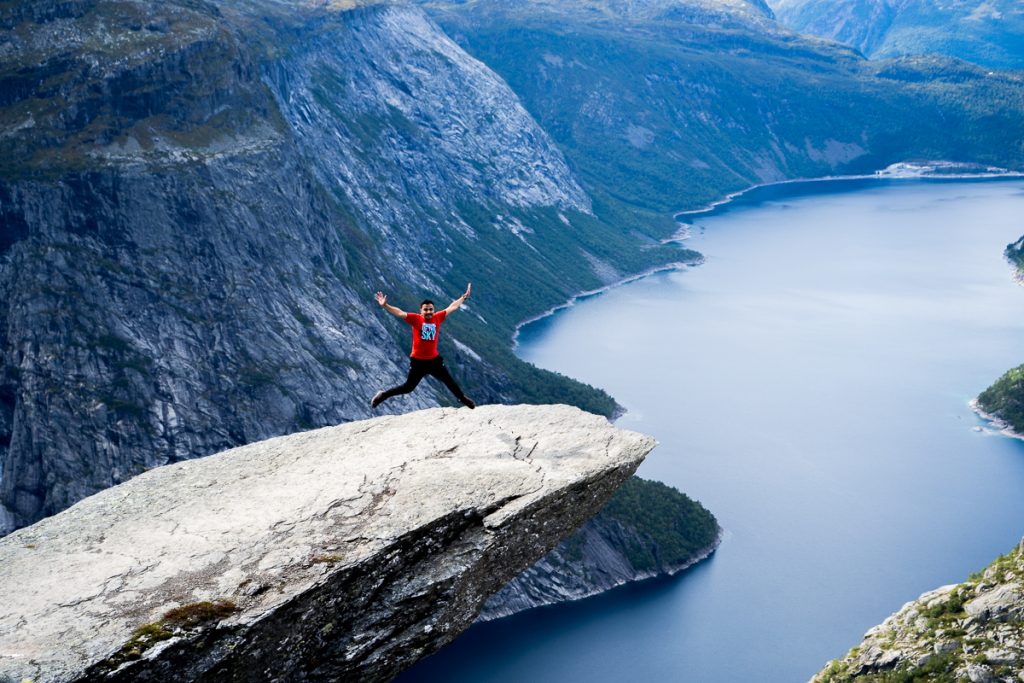
So now you might want to hear a bit about the experience of getting the coveted shot on Trolltunga itself, the Troll’s Tongue, a rock that juts out over the lake valley below.
Everyone was more or less civilised, waiting in a long queue to get their turn. However, you can’t rely on the person behind you to take the shot – you have to actually ask someone very far back in line to take the shot from a place overlooking the Troll’s Tongue, as that’s the only way to get the whole view. Otherwise, a picture from the base of the rock just looks like…you’re standing on a rock, and that rock could be anywhere. If you are in a larger party, it may be a bit easier if someone agrees to stay behind, but as there is a ladder climb down and some awkward rock-and-people manoeuvring between them and you, they won’t easily be able to exchange with someone else in the group.
We waited 3 hours. That’s longer than we’ve heard of anyone else normally waiting, HOWEVER, there is the critical fact that we did the hike on a Sunday of the August bank holiday weekend, soooo. Joke’s on us.
Ultimately, we didn’t even feel like Trolltunga itself was that impressive, and there were plenty of equally spectacular viewpoints along the hike where we got better photos with our tripod. Heck, there are even other jutty-outy rocks right near Trolltunga that some people opted to take pictures on as well, with the benefit of being able to take their time as there was no long queue. Though many people and groups took often 5 minutes or more each to get their photos, we only asked our photographer to take two quick shots. We weren’t in the mood for any more than that – it had been a long, windy, COLD wait, and we already knew our other shots along the hike were better. After a couple of hours, we almost gave up, but then we thought we’d come that far so we may as well stick it out. Word of advice – don’t stick it out. You did it. You did the hike, take a picture of Trolltunga itself if you want to, but there are better places if you want a snap of yourselves.
The only plus side was that we ate a sandwich in line. But we didn’t want to spoil our whole lunch by eating it standing in a line for a picture we knew was probably going to be a let down, so we waited until after, then found a nice sunny spot on some big warm rocks by a lake to eat the rest and talk about how that wait was one our biggest life regrets.
Rant over.
Return Journey
The return journey was more relaxed, as one would expect. We took our time, got the drone out, took more photos of the beautiful landscape. The hardest part about the return though was going back down. Muscles I didn’t know existed were sore from the monotonous descent through all the places that we thought were tough going up, and then even through the places that weren’t hard going up at all. But all in all it was pleasant, and generally quite warm in the sun.
 Fortunately, when we made it back down those devil-cursed switchbacks to the upper parking lot, a shuttle bus for the lower parking pulled up right at the same time. Some sad hikers had to keep waiting for the Odda Camping and hotel transportation, but maybe they wouldn’t have been so sad if they knew how much our shuttle cost.
Overnight/the End
As mentioned previously, we were allowed to stay in our van overnight in the lower parking lot. We even stayed past 8am the next morning because we’re rebels. But also mainly because the lot wasn’t anywhere near full and the weather wasn’t great so there weren’t going to be many hikers that day at all, much less chomping at the bit for our spot in the lower lot.
I can’t remember what we had for dinner but it was probably sausages and we probably enjoyed it immensely. I do remember be thankful yet again that we built both an indoor and outdoor shower in the van, as then Will and I could wash off the grime of a 28k hike and sleep clean and peacefully.
Overall Review
Overall, this hike easily gets 5 stars. Though tainted by our long wait for a disappointing photo, we knew what we were getting ourselves into before hand, and even during the wait itself, but we got plenty of great shots elsewhere along the way. And the hike itself is top notch. Gorgeous, unique Norwegian landscape, refreshing mountain streams to top up your water canister (handy, as then you don’t have to lug around loads of water as you normally would on such a long hike) and an ultimately rewarding trek that justifies rolling around in chocolate chip cookies and binging on Stranger Things the next day.
Trolltunga FAQ
Where to stay near Trolltunga?
Odda has the most accommodation options for doing the Trolltunga hike.
Where are the best photo spots
If you’re really really early and do the hike in a good time you’ll get a great photo on Trolltunga but there are plenty of other photo spots along the way which offer equally breathtaking shots.
 Whats the latest you can start the hike?
 Whats the latest you can start the hike?
We don’t recommend starting the hike after 10am. We feel that elsewhere the time needed to complete the hike is overhyped but if you’re doing it on a sunny day you want all the time you can to stop and admire the view and get those photos!
Can you hike Trolltunga in Winter?
There are guided tours in winter but you’re going to find it impossible unless you’re a very experienced mountaineer. With windchill you’re looking at very very very cold temperatures with deep snow and all sorts of things that can go wrong. the hiking season is from June 15 to September 15
Where can you camp in Trolltunga?
You can’t camp with 3km of Trolltunga or until 4km into the trail after you’ve completed the first big ascent. There are plenty of spots to camp so you won’t find getting a spot too difficult.